Kasm Workspaces Deployment (Behind Nginx)
Step-by-Step Guide
2025-11-03 23:20 UTC
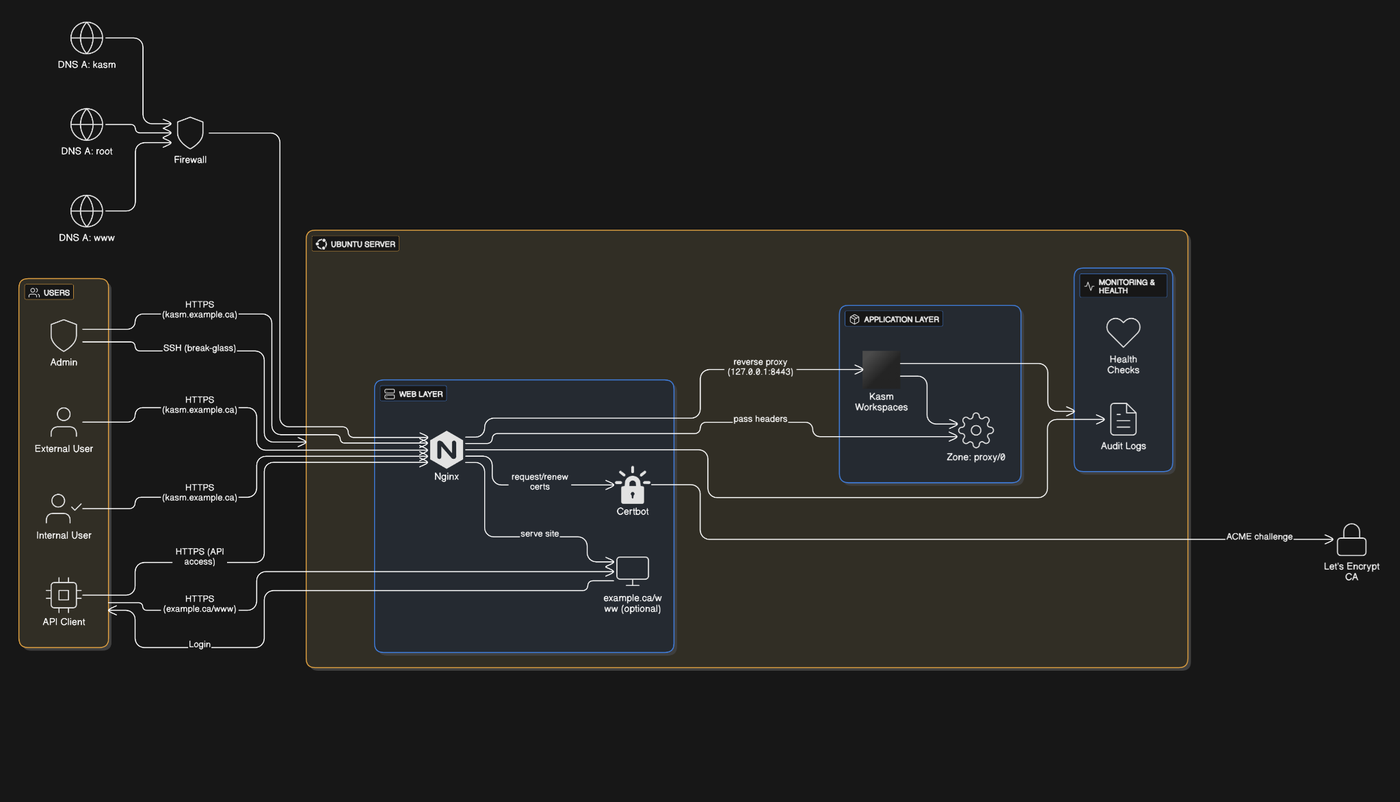
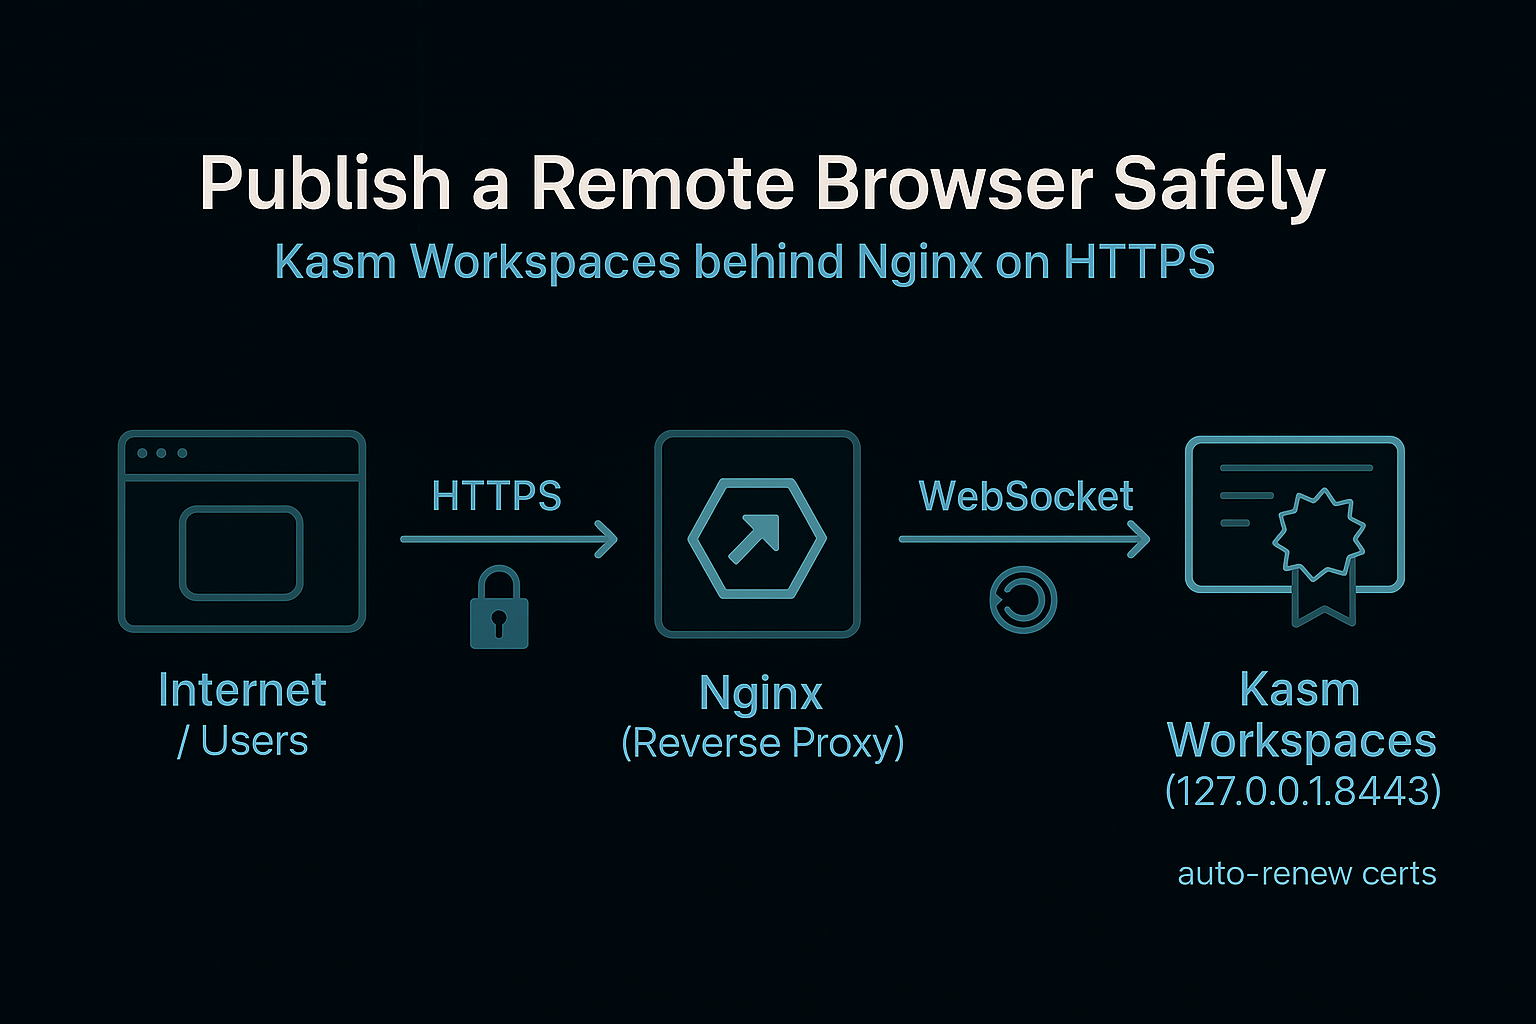
Solution pattern: Kasm Workspaces on a single Ubuntu host, bound to localhost and reverse-proxied behind Nginx, with the normal website as the only public HTTPS entry.
Problem: I needed a disposable, centrally-managed browser for untrusted links and demos without exposing a heavy VDI control plane or vendor console to the internet.
The goal was a disposable, centrally-managed browser for opening untrusted links and running demos in isolation. I wanted users to reach it via a normal HTTPS site, but I didn't want a full admin/control plane (or vendor console) exposed to the internet. So Kasm runs on a local-only port, and only Nginx is public, terminating TLS and proxying sessions. This keeps the attack surface small, lets me enforce policies (clipboard, file transfer, egress), and gives me one place to log/monitor usage—without publishing management endpoints.
What is Kasm?
Kasm Workspaces streams desktops or single apps from isolated containers to any modern browser over HTTPS. Admins control catalogs, policies (clipboard, files, persistence), and network egress; users get fast, clean sessions.
Why use Kasm?
- Isolation for safer browsing and research
- Least-privilege access for contractors/guests without agents
- Fast, reproducible environments
- Data-loss controls (clipboard/upload/download/egress)
- Simple delivery (browser-only)
- Central visibility (sessions/logs)
Flow at a glance
Users → HTTPS → Nginx (public site) → Login → Kasm (localhost-only)

Architecture Overview
Why not alternatives?
Traditional VDI (Horizon/Citrix/RDS) — why I didn't use it
What I tried:
- Spun up a small proof-of-concept with a session host and an HTML5/secure gateway.
- Tested browser streaming performance and time-to-first-session.
Findings:
- Operationally heavy for a simple RBI use-case (gateways, brokers, image/lifecycle, licensing).
- Often implies exposing a public gateway/service (or maintaining VPN access paths).
- Windows session hosts need regular patching/licensing; smooth media can require GPU tuning.
When it actually makes sense: persistent Windows desktops, published apps, deep AD/GPO needs, long-running sessions.
Public SaaS RBI — why I didn't use it
What I tried:
- Trialled a managed RBI service, set up basic policies, and validated general browsing.
Findings:
- Introduces external trust and recurring per-seat costs.
- Limited control over container images and networking; running custom tools is harder.
- Egress IPs are provider-owned, which complicated partner allow-listing and some IP-based controls.
When it actually makes sense: fast, broad rollout when vendor-managed uptime/compliance is the priority and provider egress/policies are acceptable.
"Just use a VM" — why I didn't use it
What I tried:
- Built a golden-snapshot VM, reverted between tests, accessed by RDP/HTML5.
Findings:
- Slow to provision/reset and prone to state drift between sessions.
- Inconsistent user experience; weak central policy/auditing without extra tooling.
- Scaling to many users adds brokers/gateways/licensing—creeping back toward VDI complexity.
When it actually makes sense: one-off demo boxes or very small labs where speed and tight policy aren't priorities.
How I decided (criteria & process)
Criteria:
- Security exposure: only 443 public; no admin/control plane on the internet.
- Ops overhead: cert renewals, WebSockets, and updates should be simple.
- User experience: quick time-to-first-session; smooth streaming; clean entry via the website.
- Policy & logging: strong clipboard/upload/download/egress controls; auditable sessions.
- Cost & flexibility: avoid per-seat surprises; run my own images/tools.
Process:
- Built small proofs-of-concept for each option; measured time-to-first-session.
- Verified TLS renewal, reverse-proxy headers, and health checks.
- Tested egress controls and log export paths.
Outcome: Kasm behind Nginx met the criteria with the smallest public surface, fast startup, solid policy control, and straightforward operations.
Who this is for
Primary audience
- System Administrators – own OS hardening, Nginx, TLS, DNS, and firewall. Care about low operational overhead, clear runbooks, and fast recovery paths.
- SREs – want a single, observable HTTPS edge (Nginx), simple health checks (/api/healthcheck), and clean failure modes for WebSockets and cert renewals.
- Security Engineers – need isolation-by-default for risky browsing, strong data-handling controls (clipboard/upload/download/egress), and auditable sessions.
Secondary stakeholders
- IT Managers – want a safe, supportable pattern that doesn't expand the public attack surface or lock the team into a vendor console.
- Helpdesk – launch/terminate sessions, triage basic access issues, and escalate policy questions without touching platform settings.
- Contractors/Guests – temporary access to a locked-down browser or task workspace via a discreet Login on a legitimate site—no agent installs.
Prerequisites & assumptions
- You control DNS for [DOMAIN] and [KASM_SUBDOMAIN].
- You can manage Ubuntu + Nginx (basic vhost/TLS) and UFW (22/80/443).
- You can operate Let's Encrypt/Certbot and understand reverse-proxy headers for WebSockets.
- You have a place to forward logs (syslog/SIEM) and a basic process for secrets (installer credentials, API tokens).
Variables Reference
Replace these placeholders throughout the guide:
[DOMAIN]- Your primary domain (e.g., example.com)[KASM_SUBDOMAIN]- Kasm subdomain (e.g., kasm.example.com)[STATIC_IP]- Static IP address for the server (e.g., 10.10.10.7)[GATEWAY_IP]- Gateway IP address (e.g., 10.10.10.1)[SUDO_PASSWORD]- Your sudo password[ZIP_FILE_PATH]- Path to your website zip file
Step-by-Step Implementation Guide
Step 1: System Preparation
1.1 Update System Packages
sudo apt-get update -y
sudo apt-get upgrade -y
1.2 Install Required Packages
sudo apt-get install -y nginx certbot python3-certbot-nginx unzip curl1.3 Configure Firewall (if using ufw)
sudo ufw allow 80/tcp
sudo ufw allow 443/tcp
# Optional: RDP gateway access
sudo ufw allow 3389/tcp
Step 2: Configure Network Interface (Static IP)
2.1 Identify Network Interface
ip addr showNote the interface name (commonly eth0, ens33, or enp0s3). We'll use ens33 as an example.
2.2 Backup Current Netplan Configuration
sudo cp /etc/netplan/50-cloud-init.yaml /etc/netplan/50-cloud-init.yaml.backup2.3 Create Static IP Configuration
Create/edit /etc/netplan/50-cloud-init.yaml:
network:
  version: 2
  ethernets:
    ens33:  # Replace with your interface name
      dhcp4: false
      addresses:
        - [STATIC_IP]/24  # e.g., 10.10.10.7/24
      routes:
        - to: default
          via: [GATEWAY_IP]  # e.g., 10.10.10.1
      nameservers:
        addresses:
          - 8.8.8.8
          - 8.8.4.4
2.4 Apply Network Configuration
sudo netplan apply

# Verify the configuration
ip addr show ens33
ip route show
Step 3: Install Kasm Workspaces
3.1 Download Kasm Installer
cd /tmp
KASM_VERSION="kasm_release_1.17.0.7f020d.tar.gz"
curl -O https://kasm-static-content.s3.amazonaws.com/${KASM_VERSION}
tar -xf ${KASM_VERSION}
3.2 Install Kasm (Binding to Port 8443)
cd /tmp/kasm_release
sudo bash install.sh -L 8443
Important Notes:
- The
-L 8443flag binds Kasm's web application to port 8443 to avoid conflicts with Nginx on port 443 - During installation, you'll be prompted to accept the EULA
- Random passwords will be generated for admin and user accounts
3.3 Save Installation Credentials
sudo tail -n 100 /root/kasm_install_*.log | grep -A 50 "Kasm UI Login Credentials" | sudo tee /root/kasm-install-credentials.txt
sudo chmod 600 /root/kasm-install-credentials.txt
Important: Save these credentials securely:
- Admin username:
admin@kasm.local - Admin password: (randomly generated)
- User username:
user@kasm.local - User password: (randomly generated)
- Database credentials
- Redis credentials
- Manager token
- Service registration token
Step 4: Deploy Website
Website options (front door)
You do not need Next.js for this pattern. The front can be a static page, a Next.js export, or a minimal landing page with a discreet Login. Use Next.js only if you want site features (React UI, CMS/data, i18n, SEO).
- Static site (simplest): serve /var/www/[DOMAIN] as static files
- Next.js (exported): build & export, then serve /out assets with Nginx
- Minimal landing: a single HTML page with a discreet Login to the Kasm vhost
4.1 Prepare Website Directory
sudo mkdir -p /var/www/[DOMAIN]
sudo chown -R www-data:www-data /var/www/[DOMAIN]
4.2 Extract Website Files
sudo unzip -o [ZIP_FILE_PATH] -d /var/www/[DOMAIN]
sudo chown -R www-data:www-data /var/www/[DOMAIN]
4.3 Install Node.js (if building Next.js site)
curl -fsSL https://deb.nodesource.com/setup_20.x | sudo bash -
sudo apt-get install -y nodejs
sudo npm install -g pnpm
4.4 Build Next.js Site (if applicable)
cd /var/www/[DOMAIN]
sudo chown -R $USER:$USER /var/www/[DOMAIN]  # Allow user to install packages

# install dependencies
pnpm install

# Configure Next.js for static export
cat > next.config.mjs << 'EOF'
/** @type {import('next').NextConfig} */
const nextConfig = {
  output: 'export',
  eslint: { ignoreDuringBuilds: true },
  typescript: { ignoreBuildErrors: true },
  images: { unoptimized: true },
}
export default nextConfig
EOF

# Build the site
pnpm build
The built site will be in /var/www/[DOMAIN]/out directory.
Step 5: Configure Nginx
5.1 Create Main Website Configuration
Create /etc/nginx/sites-available/[DOMAIN]:
server {
    listen 80;
    server_name [DOMAIN];
    root /var/www/[DOMAIN]/out;  # or /var/www/[DOMAIN] if not using Next.js
    index index.html index.htm;
    client_max_body_size 64m;

    location / {
        try_files $uri $uri.html $uri/ /index.html;
    }

    # Cache static assets (for Next.js)
    location /_next/static/ {
        expires 1y;
        add_header Cache-Control "public, immutable";
    }
}
Enable the site:
sudo ln -sf /etc/nginx/sites-available/[DOMAIN] /etc/nginx/sites-enabled/[DOMAIN]5.2 Create Kasm Reverse Proxy Configuration
Create /etc/nginx/sites-available/[KASM_SUBDOMAIN]:
server {
    listen 80;
    server_name [KASM_SUBDOMAIN];

    # Increase body size for file uploads
    client_max_body_size 1024m;

    location / {
        proxy_http_version 1.1;
        proxy_set_header Host $host;
        proxy_set_header X-Real-IP $remote_addr;
        proxy_set_header X-Forwarded-For $proxy_add_x_forwarded_for;
        proxy_set_header X-Forwarded-Proto $scheme;
        proxy_set_header Upgrade $http_upgrade;
        proxy_set_header Connection "upgrade";
        proxy_ssl_server_name on;
        proxy_ssl_verify off;  # For localhost-only
        proxy_pass https://127.0.0.1:8443;
    }
}
Enable the site:
sudo ln -sf /etc/nginx/sites-available/[KASM_SUBDOMAIN] /etc/nginx/sites-enabled/[KASM_SUBDOMAIN]5.3 Test and Reload Nginx
sudo nginx -t
sudo systemctl reload nginx
Step 6: Configure DNS Records
Before proceeding with SSL certificates, ensure DNS records are configured:
- A Record for
[DOMAIN]→[PUBLIC_IP] - A Record for
[KASM_SUBDOMAIN]→[PUBLIC_IP]
Verify DNS resolution:
dig [DOMAIN] +short
dig [KASM_SUBDOMAIN] +short
Both should return your public IP address.
Step 7: Install SSL Certificates
7.1 Request Let's Encrypt Certificates
sudo certbot --nginx -d [DOMAIN] -d [KASM_SUBDOMAIN] \
  --email [EMAIL_ADDRESS] \
  --agree-tos \
  --redirect \
  --non-interactive
Note: For quick lab tests you can use --register-unsafely-without-email, but in production you should specify a real --email so Let's Encrypt can send expiry notices.
This will:
- Request certificates for both domains
- Automatically configure Nginx with SSL
- Set up HTTP to HTTPS redirects
- Configure automatic renewal
7.2 Verify Certificate Installation
sudo openssl x509 -in /etc/letsencrypt/live/[DOMAIN]/fullchain.pem -noout -subject -dates7.3 Test Auto-Renewal
sudo certbot renew --dry-runStep 8: Verify Kasm Reverse Proxy Configuration
After Certbot runs, verify that the Kasm proxy settings are still intact:
sudo cat /etc/nginx/sites-enabled/[KASM_SUBDOMAIN]Ensure you see:
- proxy_set_header Upgrade $http_upgrade;
- proxy_set_header Connection "upgrade";
- proxy_set_header X-Forwarded-Proto $scheme;
- proxy_pass https://127.0.0.1:8443;
If any settings are missing, add them back to the SSL server block.
Step 9: Configure Kasm Zone Settings
9.1 Access Kasm Admin UI
Navigate to https://[KASM_SUBDOMAIN]
Log in with admin credentials (from /root/kasm-install-credentials.txt)
9.2 Configure Zone Settings
Go to: Admin → Infrastructure → Zones → Default Zone → Edit
Configure the following settings:
External Address/FQDN:
https://[KASM_SUBDOMAIN]
Public Port:
443
Enable these options:
- ✅ Force SSL
- ✅ Health check via public hostname
- ✅ Use X-Forwarded-For for client IP
- ✅ WebSocket via proxy
Upstream Protocol/Port (Internal):
- Protocol:
https - Port:
8443
Click Save
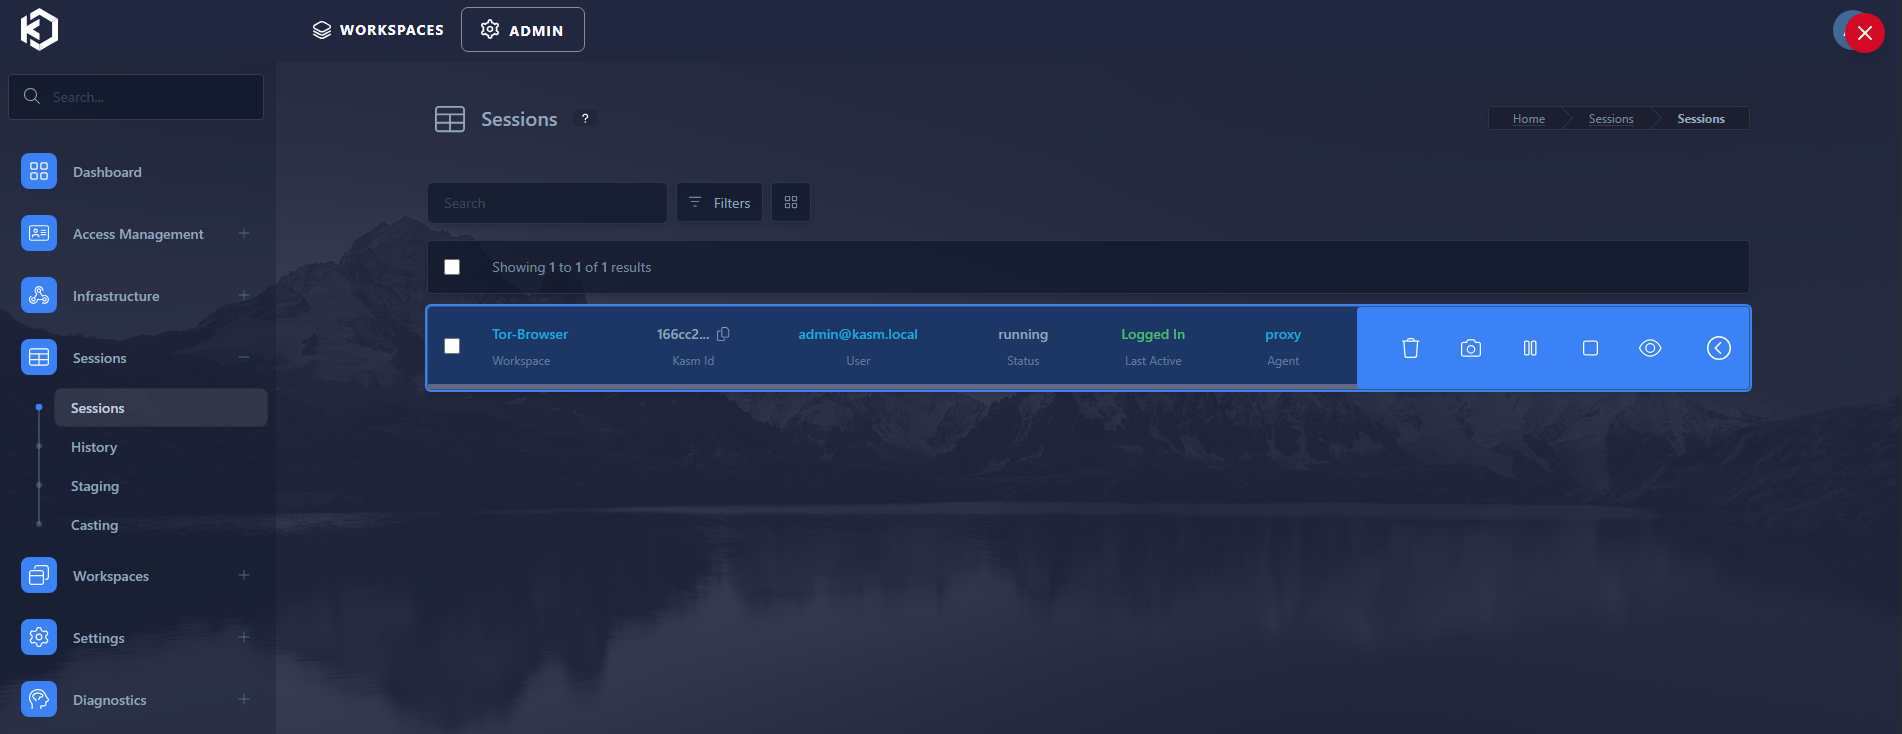
Configuration Screenshots

9.3 Verify Configuration
- Test accessing Kasm at
https://[KASM_SUBDOMAIN] - Create a test session to verify WebSocket connections work
- Check that client IPs are correctly detected
Step 10: Add Hidden Navigation Links (Optional)
If you want to add hidden links in your website that navigate to Kasm:
10.1 For Next.js/React Applications
Locate the component files where you want to add hidden links (e.g., footer, header).
Example: Footer Component
"use client"

export function Footer() {
  const handleSecretClick = () => {
    window.open("https://[KASM_SUBDOMAIN]", "_self")
  }

  return (
    <footer>
      {/* Other footer content */}
      <span
        onClick={handleSecretClick}
        className="cursor-default select-none hover:no-underline"
      >
        ©
      </span>
    </footer>
  )
}
Key Points:
- Use
window.open(url, "_self")to avoid showing URL in status bar - Apply
cursor-defaultclass to prevent pointer cursor - Use
onClickhandler instead of<a>tag
10.2 Rebuild Site After Changes
cd /var/www/[DOMAIN]
pnpm build
# Nginx will automatically serve the updated files
Step 11: Final Verification
11.1 Test Website Access
curl -I https://[DOMAIN]
curl -I https://[KASM_SUBDOMAIN]
Both should return HTTP/1.1 200 OK.
11.2 Test HTTPS Redirects
curl -I http://[DOMAIN]
curl -I http://[KASM_SUBDOMAIN]
Both should return HTTP/1.1 301 Moved Permanently with Location: https://...
11.3 Verify Kasm WebSocket Connection
- Access
https://[KASM_SUBDOMAIN] - Log in and create a test session
- Verify the session loads without WebSocket errors
Troubleshooting
Kasm Not Loading Through Proxy
- Check Nginx error logs:
sudo tail -f /var/log/nginx/error.log - Verify proxy settings are in the SSL server block
- Check Kasm logs:
sudo docker logs kasm_proxy - Ensure Zone settings match the external URL
SSL Certificate Issues
- Verify DNS records:
dig [DOMAIN] +short - Check certificate expiration:
sudo certbot certificates - Test renewal:
sudo certbot renew --dry-run
Website Not Loading
Check Nginx status:
sudo systemctl status nginxVerify site files:
ls -la /var/www/[DOMAIN]/outCheck Nginx config:
sudo nginx -tReview error logs:
sudo tail -f /var/log/nginx/error.logMaintenance
Rebuild Website After Changes
cd /var/www/[DOMAIN]
pnpm build
Update Kasm
Refer to Kasm's official upgrade documentation: https://docs.kasm.com/docs
Renew SSL Certificates
Certificates auto-renew via Certbot. Manual renewal:
sudo certbot renew
sudo systemctl reload nginx
Security Considerations
- Firewall: Set UFW to default deny inbound and allow only required ports (22, 80, 443 — and 3389 only if you intentionally expose RDP).
- SSH: Consider disabling password authentication
- Updates: Regularly update system packages
- Credentials: Store Kasm credentials securely
- Backups: Regularly backup configuration files
- Logging & monitoring: Forward Nginx and Kasm logs to syslog/SIEM and keep reasonable retention (for example, 90 days).
Summary
This deployment includes:
- ✅ Kasm Workspaces installed and accessible via reverse proxy
- ✅ Next.js website built and deployed
- ✅ SSL certificates for both domains
- ✅ HTTP to HTTPS redirects
- ✅ Hidden navigation links (optional)
- ✅ Static IP configuration
- ✅ Automatic certificate renewal
All services are accessible via HTTPS with proper security configurations.
Closing thought
Publishing a remote browser shouldn't mean publishing your control plane. The whole point of this pattern is to keep the "brain" of the system (Kasm admin, images, policies) off the public internet while still giving users something that feels simple and safe to use.
One front door (Nginx), one clean certificate, and a localhost-bound Kasm instance is usually enough to get you 80% of the value: stable sessions, predictable URLs, straightforward TLS, and a much smaller attack surface. When something breaks, you've got a single edge to debug, and a single place to send logs from.
Once that core path is rock-solid, then you layer on the extras that make sense for your environment: SSO, MFA, WAF rules, IP allowlists, maybe a VPN for admin access. But the goal doesn't change: keep the edge simple, keep Kasm private, and make sure every additional control you add is there to reduce risk or operational pain—not just to make the diagram more impressive.